First Post and This Here Blog’s Pipeline Setup
- The Why:
- Why Part 2: Why-ning
- The Task at Hand:
- Make it do the thing
- Bring forth the images
- Time to Git
- Hostinger Webhook
- Let PowerShell do the work
- Conclusion
The Why:#
I decided recently I needed to set up a blog for two reasons:
-
1st: I keep storing my notes in more and more places so I might as well add another
- 1st A: I’ve been focused on learning as many new things as i can lately, and having an opportunity and avenue to teach these things I think will help them to stick in my mind,
- 1st B: Having these lessons In a easy to reach public place would be handy
- 1st C: If I have these lessons well documented, when I forget in 6months I can reteach myself
-
2nd: I saw this amazing tutorial by Network Chuck and the timing was absolutely perfect, so figured I should take that as a sign and start in on the work.
- A link to how chuck did this will be at the bottom of the post. Id put it here but then you wouldn’t know how much I typed for this.
So to cross off the first post questions and to test the integrations are working, I am documenting as I build. Hopefully by the end of this when I press the button I have a nice and pretty blog with a nice and helpful first post ready to go. It will all be nice, and helpful and nice.
If you want to blog as you set it up as well, I would recommend creating a folder in your obsidian vault just for your posting, we don’t want to share everything to the internet so this will be a place for just the public posts to live. I called mine Posts
!
Why Part 2: Why-ning#
Why should you? Well blogging is fun the world really needs more opinions right now, everyone is so shy. no one ever says what they are thinking out loud. Learning:
- You can get your hands on some cool stuff or in my case refresh some things you’ve not touched in awhile, for instance
- Obsidian - not just for Minecraft portals
- Git - when was the last time you Git-ed for fun?
- Python - snakes are cool!
- Go - all the youtubers are talking about it, now you can too!
- PowerShell Scripting - the real reason you want to do this, automation.
- Nested bulleted lists! - this is reason enough to tackle this project.
- Debugging on your free time, I’m burying this in a list because I’m trying not to think about it.
- Nested bulleted lists! - this is reason enough to tackle this project.
Teaching Lessons Learned:#
- We have so many things we learn on a daily basis but all of it gets buried, My hope is doing something like this, following the work of other inspirational folks will get people into the habit of teaching each other, and learning for our own mistakes. So much learned information is lost even from ourselves, Taking steps to save these lessons can only help future us, and future others.
- Also you could save memes and stuff on a blog, you know its your thing do what makes you happy :)
The Task at Hand:#
This is a pipe line for taking your markdown directly from obsidian, and using a wonderful piece of software called Hugo, getting that markdown from obsidian translated to HTML, then through the magic of python and PowerShell scripting creating an orchestrator that will run everything in order to get your obsidian posts pushed straight up to the hosting platform of your choice.
Prerequisites:#
- Obsidian - This is where I am typing all of this, I have tried a few others but i keep coming back to this, I will likely create a little post of how I have themed my obsidian to look nice and behave in a way that makes a bit more sense than it does out of the box.
- Get that Git - double check you have git installed and up to date
- Get that Go - Time to remove the excuse to play around with go and get that installed
Install Hugo#
Hugo Link: https://gohugo.io/installation/
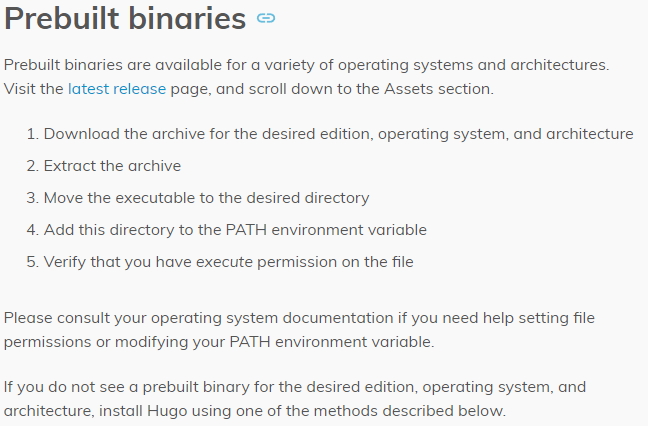
You are going to want to go to the Hugo installation, scroll down to Prebuilt Binaries
Click the Latest releases Link
!
Scroll down until you find the appropriate install zip for your hardware, I am doing this from my windows machine so i am using this…
!
Now the fun part we need to extract the hugo.exe, and save it somewhere we can find, I personally just tossed it in C:\ProgramFiles\Hugo
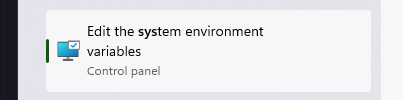
Next we need to add that to the path system environment variables, you can find this easily just by searching
!
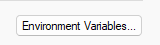
Then we click Environment variables
!
This is in the System Properties -> Advanced Tab at the bottom
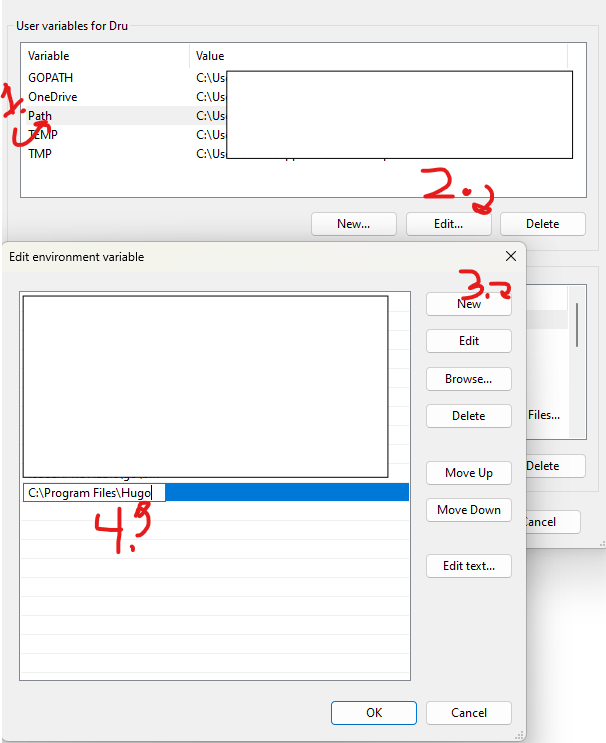
Then we just need to click on path, then click edit…
when the edit environment variable pops up, we just click new
Then paste in the file path of the Hugo.exe
!
Press ok on the windows that have popped up Then open up PowerShell and type:
Hugo Version
you should get confirmation that you now have Hugo installed.
Create our first Hugo site#
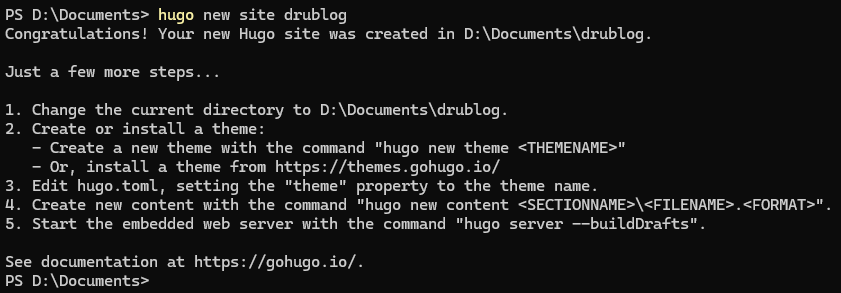
Now in PowerShell navigate to a folder that you want to create your blog in, for me that is D:\Documents
and type
Hugo new site NewSiteName
put whatever you like in place of NewSiteName, this will create a new folder with that name where your site configuration will live.
After you hit enter you should get a notification that you have a new site created in a folder.
! why are some of these screen shots and others code blocks? I don’t know either
Theme on that thang(Hugo site theme)#
- You can find themes here: https://themes.gohugo.io/
- follow the theme instructions on how to download. The BEST option is to install as a git submodule
## Initialize a git repository (Make sure you are in your Hugo website directory)

git init

## Set global username and email parameters for git

git config --global user.name "Your Name"
git config --global user.email "your.email@example.com"

## Install a theme (we are installing the Terminal theme here). Once downloaded it should be in your Hugo themes folder ## Find a theme ---> https://themes.gohugo.io/

git submodule add -f https://github.com/panr/hugo-theme-terminal.git themes/terminal
I decided to use a theme called terminal, after playing around with some others with less sucess.
For bear cub in specific all you need to do on windows is use notepad to open the hugo.toml file
notepad hugo.toml
Then just copy the base configuration code from the link above into your hugo.toml file.
Time to test!#
## Verify everything worked as expected by running

hugo server -t themename

## hugo server -t terminal in my case
Make it do the thing#
Time to get this obsidian markdown note into html and displayed in our newly themed Hugo site
First we Sync Obsidian with Hugo:
- Second first steps we need to create a folder to sync with our obsidian folder so in our blog folder we can do the following in PowerShell, you can do this all in file explorer but it feels better to do it in shell
## we can look in the blog folder and see what we have going on
PS D:\Documents\drublog> ls
    Directory: D:\Documents\drublog
Mode                 LastWriteTime         Length Name
----                 -------------         ------ ----
d-----        11/29/2024   3:12 PM                archetypes
d-----        11/29/2024   3:12 PM                assets
d-----        11/29/2024   3:12 PM                content
d-----        11/29/2024   3:12 PM                data
d-----        11/29/2024   3:12 PM                i18n
d-----        11/29/2024   3:12 PM                layouts
d-----        11/29/2024   4:07 PM                public
d-----        11/29/2024   3:12 PM                static
d-----        11/29/2024   4:01 PM                themes
-a----        11/29/2024   4:01 PM            108 .gitmodules
-a----        11/29/2024   4:07 PM              0 .hugo_build.lock
-a----        11/29/2024   4:06 PM           3663 hugo.toml

## from there we need to get into that content folder
PS D:\Documents\drublog> cd content

## then if we ls we see it is barren, awaiting our posts
PS D:\Documents\drublog\content> ls

## so lets create a folder for those posts to live
PS D:\Documents\drublog\content> mkdir posts
Now with that i realized i didn’t tell you to create a new posts folder in your obsidian, so I’m going to put that at the top but to you this line will make no sense, think of it as a todo for me that I’m not deleting. :)
Time to do the copy#
we can sync our obsidian posts with hugo using robocopy
## the syntax is
robocopy sourcepath destinationpath /mir

## for me it is

robocopy "D:\Obsidian\Second Brain\Posts" "D:\Documents\drublog\content\posts" /mir
now we can test again with
hugo server -t terminal
It works, but i don’t like the default colors, fortunately the creator of the terminal Hugo theme has an amazing page for creating some amazing themes, super fast
Now just pick your colors, download the terminal.css, favicon.png, and og-image.png files and add it to them to the blog/static/ folder
This is also a good time to check out the formatting now that things are themed, in my case I noticed quite a few inconsistencies from how things looked for me in obsidian vs how they looked in my Hugo site, Take some time and make your modifications now, make sure you really like how things look.
## Remember to refresh your page you have to remirror from obsidian and restart the server
robocopy "source path" "destination path" /mir

## then
hugo server -t terminal
Bring forth the images#
Next step we need to use a little python to bring the images over from our folder in obsidian to our Hugo site.
You may have to do some digging to find the folder in obsidian where your images are located, if you haven’t already you can specify a folder in your obsidian file structure in the obsidian settings. We do know where to put the images already, we are going to store those images in the static folder of your Hugo site, in a subfolder called images.
you can create this python script and leave it in the same blog directory by running the command
code images.py
This will create a new file and open up VsCode so you can copy and edit the code for your needs
import os
import re
import shutil
# Paths (using raw strings to handle Windows backslashes correctly)
#update with your blog post location
posts_dir = r"D:\Documents\drublog\content\posts"
#update this with where your attachments are being saved
attachments_dir = r"D:\Obsidian\Second Brain\attachments"
#this is the location where we will save the images
static_images_dir = r"D:\Documents\drublog\static\images"
# Step 1: Process each markdown file in the posts directory
for filename in os.listdir(posts_dir):
if filename.endswith(".md"):
filepath = os.path.join(posts_dir, filename)
with open(filepath, "r", encoding="utf-8") as file:
content = file.read()
# Step 2: Find all image links in the format 
images = re.findall(r'\[\[([^]]*\.png)\]\]', content)
# Step 3: Replace image links and ensure URLs are correctly formatted
for image in images:
# Prepare the Markdown-compatible link with %20 replacing spaces
markdown_image = f"})"
content = content.replace(f"[[{image}]]", markdown_image)
# Step 4: Copy the image to the Hugo static/images directory if it exists
image_source = os.path.join(attachments_dir, image)
if os.path.exists(image_source):
shutil.copy(image_source, static_images_dir)
# Step 5: Write the updated content back to the markdown file
with open(filepath, "w", encoding="utf-8") as file:
file.write(content)
print("Markdown files processed and images copied successfully.")
huge shoutout to network chuck for figuring this one out, It is a simple on the surface bit of software but you can tell its one of those things that took some time to get right.
now if we run the command:
python3 images.py
We should get a success message that our images have moved to the Hugo Site
We can now run the Hugo site locally and we should see our copied images on the locally hosted site! how neat!
Time to Git#
Now that we have a site, and a theme and all that good stuff, its time to upload it all to the internet!
We will set up a git:
- Create a Hugo Repo
- Make sure we have some ssh keys on our machine and put our public key onto git for uploads
- add, commit, and push our code
- create a branch with just the post information
- commit and push that
- remove the local branch
Hostinger Webhook#
We can set up hostinger to refresh every time there is a new update to git
- Hostinger has an out of the box webhook for this
- just need to copy the hostinger ssh key
- go to git webhooks and point it to hostinger and we are done
Let PowerShell do the work#
Now with everything set up we can run this monster PowerShell script, you may need to make sure that you can run scripts on your machine so once this is set up don’t worry if it doesn’t run the first time just check learn.microsoft.com to find out how to safely set up authorization for your machine to run locally created scripts.
so like when we created the python file from your blog folder, in PowerShell type:
code updateblog.ps1
Also, make sure to update the source, destination, and my repo in the code below they are all variables in the first few lines just make sure you have everything filled out correctly.
# PowerShell Script for Windows

# Set variables for Obsidian to Hugo copy
$sourcePath = "D:\Obsidian\Second Brain\Posts"
$destinationPath = "D:\Documents\drublog\content\posts"

# Set Github repo
$myrepo = "git@github.com:username\blogrepo.git"

# Set error handling
$ErrorActionPreference = "Stop"
Set-StrictMode -Version Latest

# Change to the script's directory
$ScriptDir = Split-Path -Parent $MyInvocation.MyCommand.Definition
Set-Location $ScriptDir

# Check for required commands
$requiredCommands = @('git', 'hugo')

# Check for Python command (python or python3)
if (Get-Command 'python' -ErrorAction SilentlyContinue) {
    $pythonCommand = 'python'
} elseif (Get-Command 'python3' -ErrorAction SilentlyContinue) {
    $pythonCommand = 'python3'
} else {
    Write-Error "Python is not installed or not in PATH."
    exit 1
}

foreach ($cmd in $requiredCommands) {
    if (-not (Get-Command $cmd -ErrorAction SilentlyContinue)) {
        Write-Error "$cmd is not installed or not in PATH."
        exit 1
    }
}

# Step 1: Check if Git is initialized, and initialize if necessary
if (-not (Test-Path ".git")) {
    Write-Host "Initializing Git repository..."
    git init
    git remote add origin $myrepo
} else {
    Write-Host "Git repository already initialized."
    $remotes = git remote
    if (-not ($remotes -contains 'origin')) {
        Write-Host "Adding remote origin..."
        git remote add origin $myrepo
    }
}

# Step 2: Sync posts from Obsidian to Hugo content folder using Robocopy
Write-Host "Syncing posts from Obsidian..."

if (-not (Test-Path $sourcePath)) {
    Write-Error "Source path does not exist: $sourcePath"
    exit 1
}

if (-not (Test-Path $destinationPath)) {
    Write-Error "Destination path does not exist: $destinationPath"
    exit 1
}

# Use Robocopy to mirror the directories
$robocopyOptions = @('/MIR', '/Z', '/W:5', '/R:3')
$robocopyResult = robocopy $sourcePath $destinationPath @robocopyOptions

if ($LASTEXITCODE -ge 8) {
    Write-Error "Robocopy failed with exit code $LASTEXITCODE"
    exit 1
}

# Step 3: Process Markdown files with Python script to handle image links
Write-Host "Processing image links in Markdown files..."
if (-not (Test-Path "images.py")) {
    Write-Error "Python script images.py not found."
    exit 1
}

# Execute the Python script
try {
    & $pythonCommand images.py
} catch {
    Write-Error "Failed to process image links."
    exit 1
}

# Step 4: Build the Hugo site
Write-Host "Building the Hugo site..."
try {
    hugo
} catch {
    Write-Error "Hugo build failed."
    exit 1
}

# Step 5: Add changes to Git
Write-Host "Staging changes for Git..."
$hasChanges = (git status --porcelain) -ne ""
if (-not $hasChanges) {
    Write-Host "No changes to stage."
} else {
    git add .
}

# Step 6: Commit changes with a dynamic message
$commitMessage = "New Blog Post on $(Get-Date -Format 'yyyy-MM-dd HH:mm:ss')"
$hasStagedChanges = (git diff --cached --name-only) -ne ""
if (-not $hasStagedChanges) {
    Write-Host "No changes to commit."
} else {
    Write-Host "Committing changes..."
    git commit -m "$commitMessage"
}

# Step 7: Push all changes to the main branch
Write-Host "Deploying to GitHub Master..."
try {
    git push origin master
} catch {
    Write-Error "Failed to push to Master branch."
    exit 1
}

# Step 8: Push the public folder to the hostinger branch using subtree split and force push
Write-Host "Deploying to GitHub Hostinger..."

# Check if the temporary branch exists and delete it

$branchExists = git branch --list "hostinger-deploy"
if ($branchExists) {
    git branch -D hostinger-deploy
}

# Perform subtree split
try {
    git subtree split --prefix public -b hostinger-deploy
} catch {
    Write-Error "Subtree split failed."
    exit 1
}

# Push to hostinger branch with force
try {
    git push origin hostinger-deploy:hostinger --force
} catch {
    Write-Error "Failed to push to hostinger branch."
    git branch -D hostinger-deploy
    exit 1
}

# Delete the temporary branch
git branch -D hostinger-deploy

Write-Host "All done! Site synced, processed, committed, built, and deployed."
Make sure to save and we are ready to run our automation!
Conclusion#
Well this was a bunch of work and it took some time but now that its set up all we have to do is create a new note in our posts folder and run the above power shell script with:
.\updateblog.ps1